Thursday, November 29, 2007

Search EKP's catalogs from your browser's search box

EKP 5.0 makes it possible to search EKP's course catalogs directly from the search box of Internet Explorer 7 or Firefox 2.

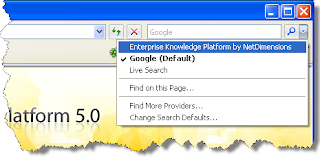
When a user visits EKP using Internet Explorer 7, the drop-down arrow of the search box "lights up" to indicate that EKP has been added to the drop-down menu.

Internet Explorer's search box with drop-down arrow "lit up"

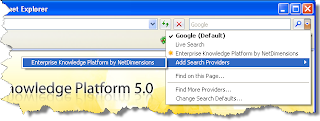
To add the EKP search provider, select Add Search Providers from the drop-down menu, then select Enterprise Knowledge Platform by NetDimensions.

Adding search provider from drop-down menu

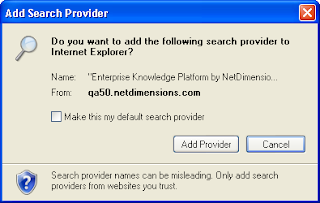
Internet Explorer will prompt you to confirm that you want to add the search provider.

Add Search Provider confirmation dialog box

After clicking Add Provider, select Enterprise Knowledge Platform by NetDimensions from the drop-down menu.

Selecting EKP from the drop-down menu

With the EKP search provider selected, initiating a search from Internet Explorer's search box opens EKP's catalog search results page directly.

Search box with EKP search provider activated

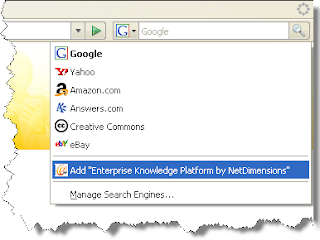
Similarly, when a user visits EKP using Firefox 2, the drop-down arrow of the search box "lights up" to indicate that EKP has been added to the drop-down menu.

Firefox's search box with drop-down arrow "lit up"

To add the EKP search provider, select Add "Enterprise Knowledge Platform by NetDimensions" from the drop-down menu.

Adding EKP search provider from drop-down menu

With the EKP search provider selected, initiating a search from Firefox's search box opens EKP's catalog search results page directly.

Search box with EKP search provider activated

Sunday, September 2, 2007

How can I publish an Articulate Quizmaker quiz as an AICC course package that I can import into EKP?

Articulate Quizmaker is capable of publishing quizzes as both SCORM and AICC content. EKP can import and deliver both formats. One advantage of publishing as AICC content is that learners do not have to have Java installed in order to take the quizzes. However, there are a few points to bear in mind when publishing Quizmaker quizzes as AICC content. By following the steps below, you can publish a quiz as an AICC course package and import the package into EKP.

  1. Click the Publish button in the Quizmaker toolbar. The Publish button in the Quizmaker toolbar
  2. In the Publish window, choose LMS from the left menu. The LMS button in the left menu of the Publish window
  3. In the LMS field under Output Options, select AICC. LMS field under Output Options
  4. Click Reporting and Tracking... Reporting and Tracking... button
  5. Under LMS Course Information in the LMS Metadata window, complete the Description and Creator fields. Description and Creator fields under LMS Course InformationNote that if you leave these fields blank, Quizmaker will omit these fields from the published AICC files, resulting in files that are invalid according to the AICC specification. Therefore, in order to produce a valid AICC course package, you must complete these fields before publishing the quiz.
  6. The default value of the Filename(URL) field is http://www.servername.com/quiz/index_lms.html. While it's possible to replace this with the full URL at which the quiz will be published, it's easier to simply remove the initial portion so that the value becomes just index_lms.html. (Note that the value should not contain any slash characters.) Filename(URL) fieldIf you then import the quiz into EKP as an AICC course package as described below, EKP can automatically deduce the full URL needed to launch the quiz.
  7. Click the OK button to dismiss the LMS Metadata window. OK button
  8. In the Publish window, under Output Options, ensure that the check box labeled Zip files is checked. Zip files check box
  9. Click Publish. Publish button

The resulting zip file can be imported into EKP using the Import Content Package function (Manage > Catalog Manager > Import Content Package)—simply follow the on-screen instructions.

In summary, the important points are as listed below.

  • Be sure to complete the Description and Creator fields in the LMS Course Information section of the LMS Metadata window.
  • Enter index_lms.html in the Filename(URL) field.
  • Under Output Options in the Publish window, ensure that the check box labeled Zip files is checked.
  • Import the published zip file into EKP using the Import Content Package function.

Tuesday, August 28, 2007

EKP 4.7 Courselets

We've just published the second of a two-part series of "courselets" covering the new features in EKP 4.7. This part specifically covers features related to exam authoring, management and delivery. (Features not specifically related to exam management were covered in part one.)

Thursday, July 26, 2007

Can I launch courses directly from a portal so that learners don't have to log into EKP, but still have EKP track the learners' progress?

In order to link to a course so that the course launches immediately, and is tracked by EKP, you can link to the launchByCourseId transaction, e.g.:

/ekp/servlet/ekp/launchByCourseId?courseId=My_Course

(Note that this requires that the learner already be enrolled in My_Course, so you might want to pre-enroll learners using a Group Enroll or Auto-Enroll.)

If you link directly to the URL above, and the learner does not yet have a session with EKP, she will be prompted to log in as normal. In order to achieve “transparent login”, you can use one of the two mechanisms described below.

  1. Implement the "external authentication service" mechanism. To implement this, the portal would need to be modified to generate “authentication tokens” (cryptographic hashes) when requested by EKP. Then, EKP's configuration is modified so that, when it needs to authenticate a user, it redirects to the portal to request an authentication token instead of showing the standard login page.

    Note that this mechanism has the significant advantage that it is not required that users' passwords be synchronized in the two systems. In fact, when using this mechanism, the passwords stored in EKP's database are never used.
  2. Use the standard verify transaction. This is the transaction that is used to validate a user ID and password submitted using the normal login page. It is possible to add a target parameter to specify the page to which the user should be redirected after a successful login (instead of the normal home page). In particular, if you want to start a course after login, you can specify the launchByCourseId transaction (with appropriate courseId parameter value) as the value of the target parameter. E.g.:
    /ekp/servlet/ekp?TX=VERIFY&UID=joestudent&PWD=password&target=%2Fekp%2Fservlet%2Fekp%2FlaunchByCourseId%3FcourseId%3DMy_Course
    Note that the value of the target parameter has been percent-encoded.

    The above example includes the parameters in the query string—however, for security reasons you should avoid including the user ID and password in the URL—therefore, the portal should be coded to use the POST method rather than GET to invoke the verify transaction.

Note that, unlike method 1, method 2 requires passwords to be synchronized between the two systems, which could be difficult to achieve if passwords are changed regularly (a good security practice). (This problem can be avoided by configuring both systems to use the same directory server, i.e. Active Directory or LDAP.) In addition, method 2 requires embedding the user's password in an HTML page (or HTTP redirect header), which might be cached. For these reasons, we recommend using method 1 if possible.

Thursday, June 28, 2007

Can I use an external authentication service so that users don't need to log into EKP directly?

(Note: this post contains technical details that will likely be of most interest to developers.)

In a typical organization, EKP will be one of many applications that employees or other stakeholders use on a regular basis. In this situation, it's typically desirable to provide some kind of single (or reduced) sign on, so that users don't have to perform separate logins to different applications.

EKP provides a number of mechanisms to help solve this problem. Some of those most commonly-used are listed below.

  • Support for LDAP and Active Directory services: Use of an LDAP or Active Directory service avoids the needs to store and update users' passwords in EKP's database, because users' credentials are checked against the centralized directory service when they log in. This works even if the user is accessing EKP over the internet. However, it does not actually eliminate the need for the user to perform a login to access EKP. (For details of LDAP- and Active Directory-based authentication, see the LDAP Authentication Integration Configuration Guide and the Active Directory Authentication Integration Configuration Guide respectively.)
  • Support for Integrated Windows Authentication: Use of Integrated Windows Authentication avoids not only the need to store and update users' passwords in EKP's database, but also the need for users to explicitly log into EKP, because their identity is automatically propagated to EKP based on their Windows login. However, Integrated Windows Authentication typically only works within a Windows-based intranet; it typically will not work for access over the internet. (For details on using Integrated Windows Authentication with EKP, see the Single Sign-On Integration with Windows document.)

However, it's often desirable to provide an integrated authentication mechanism that will work over the internet, even if the authentication service is not physically co-located with EKP. This post describes such a mechanism.

For the sake of example, let's suppose that you are running a company portal alongside EKP, and that you want your portal users to be able to access EKP. However, you do not want users to have to log into EKP separately; rather, you want all authentication to occur via the portal, with users' identities being propagated to EKP once they have authenticated through the portal.

In order to enable the integrated authentication mechanism, it's necessary to define a couple of properties in the ekp.properties configuration file (under the WEB-INF/conf/ directory), as shown below.

authentication.key=mysecretkey
authentication.service.url=http://portal.abc.com/login.asp

The significance of these properties and their values is explained below. In addition, another optional property may be specified, as shown below.

authentication.digestAlgorithm=SHA

The value of this property specifies the cryptographic hash function that will be used as part of the authentication process, as explained below. Permitted values are MD5 and SHA. If this property is not specified, a default value of MD5 is assumed.

Normally, when an unauthenticated user tries to access a page in EKP that requires authentication, she will be redirected to EKP's standard login page. With the integrated authentication mechanism enabled, she will instead be redirected to the URL specified by the value of the authentication.service.url property. (Note that it does not matter how the user came to access the EKP page. She might have accessed the page by following a link from the portal, but that's not necessary for the mechanism to work.)

EKP will also append a query string parameter named salt to the URL that is the target of the redirect. The value of this parameter is a random sequence of bytes, converted to characters using Base64 encoding. The purpose of the salt value is to prevent replay attacks—which is to say that if an attacker was able to intercept the URL generated by the portal as described below, they would not be able to reuse it authenticate against EKP after the salt value expired.

An example of a possible redirect target URL is shown below.

http://portal.abc.com/login.asp?salt=OqQ1uao%3D

(N.B. In this example, the raw Base64-encoded salt value is the character string OqQ1uao=. However, the equals character “=” has special meaning when used in URLs, so the value has been URL-encoded as OqQ1uao%3D.)

On receiving the request from the redirected client, the portal needs to perform the following steps.

  • Recover the original bytes of the salt by Base64-decoding the URL parameter value.
  • Authenticate the user if she does not already have a session with the portal.
  • Using the function configured as described previously, calculate a cryptographic hash of the user ID, secret key (this is the value of the authentication.key property described above) and salt value.
  • Convert the bytes of the cryptographic hash to a character string using Base64.
  • Redirect the client back to EKP's authenticationTokenVerifier transaction, passing both the user ID and the Base64-encoded cryptographic hash as query string parameters.

For example, assuming that the user is authenticated by the portal as joestudent, and the secret key is mysecretkey, then the MD5 cryptographic hash (after Base64 encoding) would be vf1nZ7R2YSoso+g+BLLVog==, and the EKP URL to which the portal would redirect the client would look as shown below.

/ekp/servlet/ekp/authenticationTokenVerifier?userId=joestudent&digest=vf1nZ7R2YSoso%2Bg%2BBLLVog%3D%3D

(Note that the value of the digest parameter is the URL-encoded cryptographic hash.)

On receiving the request from the redirected client, EKP will perform its own computation of the cryptographic hash and compare it with the value passed by the portal. If the values match, this is accepted as proof that the redirect was actually generated by the portal and was not “spoofed”. EKP then considers the client to be authenticated and establishes a session with the client.

The following sample code provides an outline of how the mechanism described above might be implemented as a Java servlet.

String saltStr = req.getParameter("salt");
byte[] salt
  = new sun.misc.BASE64Decoder()
      .decodeBuffer(saltStr);
  
String key = "mysecretkey";
String userId = "joestudent";
  
// Calculate a digest
java.security.MessageDigest md
  = java.security.MessageDigest.getInstance("MD5");
  
// Convert user ID and key to bytes--need to
// specify a character encoding here in case the
// default encodings are different on the two
// systems.
md.update(userId.getBytes("UTF-8"));
md.update(key.getBytes("UTF-8"));
md.update(salt);
byte[] digest = md.digest();
  
// Use Base64 encoding to turn the digest into a
// string, so we can pass it in the URL.
String digestStr
  = new sun.misc.BASE64Encoder().encode(digest);
  
// Encode the digest again using URL encoding to
// escape any special characters.
String url
  = "http://ekp.abc.com/"
  + "ekp/servlet/ekp/authenticationTokenVerifier"
  + "?userId="
  + java.net.URLEncoder.encode(userId, "UTF-8")
  + "&digest="
  + java.net.URLEncoder.encode(digestStr, "UTF-8");
  
response.sendRedirect(url);

The mechanism described in this post works in EKP 4.6 Gold build 116 or higher, and in EKP 4.7 Gold build 52 or higher.

Can I remove the calendar view that displays on the right side of the Enrolled Learning Modules tab?

By default, EKP displays a calendar view on the right side of the Enrolled Learning Modules tab.

Enrolled Learning Modules tab with calendar view

This calendar view can be hidden for a specific skin by adding a Cascading Style Sheet (CSS) rule to the main style sheet for the skin. The rule is as shown below.

.enrolled-learning-modules-calendar {
   display: none;
}

For an explanation of how to locate the file to which this rule should be added, see this previous post.

Please note that this requires one of the following builds: EKP 4.5 build 190 or higher; EKP 4.6 build 61 or higher; or any EKP 4.7 build. The CSS rule will have no effect on earlier builds.

Monday, June 25, 2007

I have entered a Request For Enhancement in TestTrack Pro, why isn't it available on the enhancememts voting site?

All Requests For Enhancement entered into TestTrack Pro will be considered for inclusion on the enhancements voting site. Requests will generally be accepted for inclusion if they meet the following two criteria.

  • The Summary and Description fields should not contain any confidential information—that is, any information that you would not want other NetDimensions customers or partners to see. Please be aware that we need to be cautious here, so where there is any doubt we will tend to assume that information about specific users, organizations, courses etc. may be confidential unless this is clearly not the case. Note that such information can be added as comments to the TestTrack Pro issue, since these will not appear on the voting site. Also bear in mind that use of your organization-specific terminology or other organization-specific information might reduce the clarity of the suggested enhancement for other voters—see below.
  • Many screens in the voting site display only the issue summary, not the full description. Therefore, it needs to be reasonably clear from the summary alone what the proposed enhancement is, including both the specific change and the context. For example, if you wanted to suggest adding the ability to clone user roles, neither "Clone function" nor "Enhancement for User Roles" would be a sufficiently descriptive summary field. (The former does not indicate what the clone function would actually clone, while the latter only indicates that the enhancement would affect user roles, without specifying what it would actually do.) On the other hand, "Add a function for administrators to clone user roles" would be a perfectly acceptable summary.

Of course you are still welcome to submit enhancement requests that do not meet these criteria—it's just that they probably won't appear on the voting site.

Note that we will generally not edit issues that don't meet these criteria—we don't want to put words into your mouth! However, if you have entered a TestTrack Pro issue that currently does not appear on the voting site, you are welcome to edit the issue yourself and we will happily reconsider it.

Finally, please note that issues that are accepted for the voting site won't necessarily appear right away. The voting site is a work in progress and we're still refining the process by which the site will be synchronized with TestTrack Pro. In the long run our aim is that it should take no more than a week or so for new enhancement requests to appear on the voting site, but in the initial stages it might be several weeks before your enhancement requests appear. We appreciate your patience!

Wednesday, May 16, 2007

Automatic enrollments based on elapsed time since Join Date

A few weeks ago I wrote about the relationship between auto-enroll rules and prerequisites.

Here's another enhancement in EKP 4.7: it's now possible to define an auto-enroll rule based on elapsed time since the learner's Join Date.

Auto-Enroll Target: Join Date is at least 60 days ago

This should be very useful to anyone looking to deliver staged orientation training using EKP. It could also be used to solicit feedback from new hires by assigning a short survey a month or two after they join the organization.

Monday, April 30, 2007

The Other Resources tab

In addition to the News, Enrolled Learning Modules, Pending Enrollments and Records/Transcript tabs, EKP 4.6 provides an option to include a tab labeled Other Resources on learners' Home Pages.

However, until now this tab was pretty much reserved for Books24x7.

As of EKP 4.6 build 102, it's possible to target any enrollable learning module (but not programs) to the Other Resources tab instead of the Enrolled Learning Modules tab. This is done on the Define Module Properties page of the Catalog Editor—simply check the check box labeled Show on Other Resources tab instead of Enrolled Learning Modules tab (tabbed interface only), then click the Save button in the top frame.

This would typically be appropriate for modules that function as reference resources, rather than as activities or tasks that the learner would be expected to complete.

Sunday, April 29, 2007

Multiple GlobalEnglish accounts on a single EKP site

About three years ago, we added to EKP the ability to integrate with GlobalEnglish, which provides online English language instruction to global companies. An administrator can create a module in EKP that acts as a gateway to the GlobalEnglish portal, and can then control access to GlobalEnglish in using EKP's standard enrollment mechanisms.

Prior to EKP 5, the GlobalEnglish account details were specified as part of the system configuration. Consequently, only a single GlobalEnglish account could be used with each EKP instance.

However, in large global companies, separate departments sometimes have distinct GlobalEnglish accounts. In EKP 5, we've made it possible to specify GlobalEnglish account details as part of the module configuration, making it possible to use multiple accounts with a single EKP installation.

Here's how to create a module for GlobalEnglish access in EKP 5.

  • Go to Manage > Catalog Manager > Module Editor.
  • Click the Create Learning Object button in the top frame.
  • Enter a Learning ID for the module, and ensure Online is selected as the Learning Type, then click Create.
  • On the Define Module Properties page, enter a Title and Description for the module.
  • Go the the Define Launch Properties page.
  • In the Launch Interface drop-down list, choose GlobalEnglish.
  • In the Keycode field, enter the account keycode as provided by your GlobalEnglish representative.
  • Click the Save button in the top frame.

Tuesday, April 24, 2007

Quick Start buttons in Knowledge Centers

EKP's Knowledge Centers provide convenient access to all resources associated with a learning activity. Knowledge Centers are available for both modules and programs.

A Knowledge Center for a module can contain a single Quick Start buttons that is used to launch any associated course. A Knowledge Center for a program can contain Quick Start buttons for each of its constituent modules.

As with most other Knowledge Center items, a system-wide configuration options enables administrators to control whether these Quick Start buttons appear. In EKP 4.6 and earlier, Quick Start buttons could be enabled for both module and program Knowledge Centers, or disabled for both module and program Knowledge Centers.

In EKP 4.7, there is a third option—it is now possible to enable Quick Start buttons for module Knowledge Centers, but disable them for program Knowledge Centers. This can be used to simplify program Knowledge Centers, while enforcing the use of module Knowledge Centers as a single point-of-access for launching courses. (Note that the Knowledge Centers for the individual modules in a program will be accessible from the program's Knowledge Center.)

Monday, April 23, 2007

Automatic enrollments and prerequisites

EKP makes it possible to define auto-enroll rules for module and program sessions. These ensure that specified groups of learners will automatically be enrolled in the session the first time they log into EKP, even if those learners don't yet have accounts in the system.

In EKP 4.6 and earlier, auto-enroll rules would always override any prerequisites that had been defined for the module. In EKP 4.7, this behavior is configurable using the Ignore prerequisites for automatic enrollments property under Manage > System Administration Manager > System Configuration > System Configuration.

If this property is disabled, auto-enroll rules won't take effect until all prerequisites for the module are satisfied. This makes it possible to establish paths of learning. For example, an administrator could create an Advanced Project Management program or module, with an Introduction to Project Management program or module as a prerequisite, and define auto-enroll rules for the appropriate learner groups. Once a learner in one of the appropriate groups has completed the introductory program or module, she will automatically be enrolled in the advanced program or module the next time she logs into the system.

Sunday, April 15, 2007

Batch importer for SCORM courses

EKP has long featured a batch importer for AICC-conformant courseware. Starting with EKP 4.7, the importer also supports SCORM-conformant courseware.

To use the batch importer, you'll need to create a new zip file that contains the individual SCORM content packages. (IMS content packages will work too.) Since these content packages are themselves zip files, you'll have a zip file that contains multiple individual zip files as entries. Then, go to Manage > Catalog Manager > Import Content Package, select the zip file you created, and click the Next > button.

EKP will display a summary of the courses that will be imported, and will walk you through the various import options. Just follow the on-screen instructions. (The process is pretty much identical to the AICC batch import process.) And, if you make a mistake, there's also a batch delete function that you can use to undo your changes.

Saturday, April 7, 2007

More on elective program modules

In a previous post, I described how program sessions can contain both required and elective modules in EKP 4.7.

But what happens if a session contains a large number of elective modules? How does a learner keep track of which ones she is working on?

In EKP 4.7, an administrator can specify which elective modules are automatically assigned to learners who enroll in the program session. Learners can then add more elective modules to their list of active modules, or remove elective modules that they do not intend to complete, via the program's Knowledge Center. (Required modules are always assigned automatically.)

Selecting which elective modules are automatically assigned to learners who enroll in a program session

EKP displays a list of available elective modules at the bottom of the Knowledge Center's Main tab. The learner can click the appropriate Enroll button to add a module to her list of active modules for the program.

List of available elective modules at the bottom of a Knowledge Center's Main tab

The list of active and completed modules indicates whether each module is required. The learner can remove incomplete elective modules from the list of active modules by clicking the appropriate Withdraw Enrollment button. The module is returned to the list of available modules. Required modules cannot be removed from the list of active modules.

Withdraw Enrollment button

Sunday, March 4, 2007

Can I hide the headlines that appear on the News tab?

By default, EKP displays summary headlines above the full text of the news articles on the News tab of the Home Page.

Summary headlines above the full text of news articles on the News tab of the Home Page

These can be disabled for individual skins by adding a Cascading Style Sheet (CSS) rule to the main style sheet for the skin. The rule is as shown below.

.headlines {display: none;}

This rule should be added to the file named main.css inside the skin directory. For example, for the EKP46-Tab skin, the rule would be added to the file named main.css inside the ekp/nd/fresco/styles/EKP46-Tab/ directory.

Wednesday, February 28, 2007

Elective program modules in EKP 4.7

In EKP 4.7, it's possible to specify that some modules in a learning program session are elective, meaning that the learner is not required to complete the module in order to complete the program session.

Selecting elective modules in a learning program session

It's also possible to specify the number of credit hours the learner needs to earn from elective modules before the program is considered to be completed. (That is, in order to complete the program, the learner needs to complete all the required modules, and also sufficient elective modules to earn the required number of credit hours.)

Specifying the number of required credit hours

EKP can display three new columns on the Enrolled Learning Modules tab. These show, respectively, whether a program module is required or elective, the number of training/credit hours available for a module, and the percentage of a program that has been completed. (An administrator can choose whether to show each of these individual columns by going to Manage > System Administration Manager > System Configuration > System Configuration.)

New columns on the Enrolled Learning Modules tab

The required/elective and training hours columns are also available in program Knowledge Centers.

(Note that, in order for EKP to automatically mark programs as completed when the appropriate requirements are met, the option Enable Automatic Completion of Learning Programs must be enabled under System Configuration.)

Improvements to bulk courseware import tool

We just made some improvements to the bulk courseware import tool. This tool makes it easy to import many AICC-conformant courses in a single step. To use it, simply package the course structure files for the courses in a single zip file, then go to Manage > Catalog Manager > Import Content Package and upload the zip file. (Each course should have a set of four files, with the same base file name, and file name extensions .au, .crs, .cst and .des respectively. Some tools and vendors provide extra files, but EKP doesn't need them.)

Perhaps the most useful change is that EKP now shows the full titles and IDs of several of the courses in the package on the import options screen right after you select the package and the character encoding. That lets you see what courses are available in the package before running the import. It's also helpful if you're not sure what character encoding to use, since you can check that the course titles look correct before running the import, and if not you can return to the previous step and choose a different encoding.

Bulk courseware import preview

EKP also now shows full course titles in addition to IDs on the summary page once the bulk import is complete.

We've also simplified the process in the case where the package contains only a single set of course structure files. In this case, the process is almost identical to importing a SCORM content package, and EKP will provide a detailed error report if it finds any problems with the files.

These changes will be available in versions 4.6.0.83 and 4.5.1.197.

Why does my SCORM course display an "Unable to find an API adapter" message?

When a SCORM course is packaged in a zip file (sometimes called a PIF, which stands for Package Interchange Format), the package needs to contain a manifest file named imsmanifest.xml. This file is used by delivery systems such as EKP to understand the contents of the package.

A SCORM course contains one or more resources (roughly speaking, the "lessons" in the course). In SCORM 1.2, each resource is either a sharable content object (SCO) or an asset. A SCO is specially designed to communicate with a learning management system (LMS)—for example by informing the LMS about the learner's test scores or other progress information—which it does using JavaScript calls. On the other hand, an asset is not specially designed to communicate with an LMS—essentially, it is just regular web content.

The manifest file contains information about each resource, together with an indication of whether each resource is a SCO or an asset. A typical XML element for a resource might look as shown below.

<resource identifier="R1" type="webcontent"
        adlcp:scormtype="sco" href="sco01.html">

Note the adlcp:scormtype attribute. There are two possible values for this attribute, sco and asset, corresponding with the two resource types described above. If the type is specified as sco, EKP will provide a JavaScript object called the API adapter, which the SCO can use to communicate with EKP. If the type is specified as asset, EKP assumes that the resource is not designed to communicate with an LMS using JavaScript, and therefore does not provide the API adapter. (Instead, EKP provides a button labeled Mark As Completed, which the learner can use to indicate that they have completed the activity.)

In particular, note that if the adlcp:scormtype attribute is omitted, EKP assumes that the resource is an asset, and therefore does not provide the API adapter.

If you see an error message that reads Unable to find an API adapter or similar when launching a course that has been imported from a content package, it might be that either the resource has incorrectly been tagged as an asset, or the adlcp:scormtype attribute is missing entirely. In this case, the problem can be fixed by manually editing the imsmanifest.xml file to include the correct attribute values for each resource.

There's one final XML technicality to be aware of. In order ensure that the attribute name adlcp:scormtype can be understood without ambiguity by an XML processor, it's necessary to ensure that the XML file contains a namespace declaration that corresponds with the namespace prefix adlcp. This declaration takes the form of an XML attribute that is usually placed on the root element of the file. The attribute is as shown below.

xmlns:adlcp="http://www.adlnet.org/xsd/adlcp_rootv1p2"

The initial opening tag of a manifest file that contains this attribute might look as shown below.

<manifest identifier="M1" version="1.1"
    xmlns="http://www.imsproject.org/xsd/imscp_rootv1p1p2"
    xmlns:adlcp="http://www.adlnet.org/xsd/adlcp_rootv1p2">

How can I link directly to a page in EKP without losing the navigation frames?

Sometimes it's convenient to link directly to pages in EKP from external systems. For example, if you have a course with ID MY_COURSE, you could link to the course catalog page from a page on your company intranet by using a URL like the one below.

/ekp/servlet/ekp?TX=FORMAT1&CID=MY_COURSE

However, if you create a link in this way then the visitor will see only the course catalog page, not the usual EKP navigation frames, so she will not be able to explore EKP, or even log out.

With a little more work, it's possible to create a URL that will let you link to the same page in such a way that it's displayed with the standard navigation frames. You do this by using a URL that follows the pattern shown below.

/ekp/servlet/ekp/pageLayout?mainSrc={URL-of-target-page}

You need to replace {URL-of-target-page} with the actual URL of the target page. However, this URL needs to be URL-encoded. It's beyond the scope of this blog post to fully explain how URL-encoding works, but basically it involves replacing special characters with an encoded form that consists of a percentage symbol (%) followed by two letters or digits. For example, the slash character (/) is replaced by the percentage symbol followed by the digit 2 and the letter F. Here is a more detailed explanation of URL-encoding.

To return to our original catalog page example, the URL-encoded form of the target URL is as shown below.

%2Fekp%2Fservlet%2Fekp%3FTX%3DFORMAT1%26CID%3DMY_COURSE

Once this is substituted into the URL that displays the navigation frames, the final full URL is as shown below.

/ekp/servlet/ekp/pageLayout?mainSrc=%2Fekp%2Fservlet%2Fekp%3FTX%3DFORMAT1%26CID%3DMY_COURSE

The same technique can be used for any internal EKP page that can be linked to directly.

Monday, February 19, 2007

Why doesn't the Exit button in my course work?

This is an area where the courseware standards (SCORM, AICC) don't really correspond with real-world usage.

According to SCORM, exiting a course is considered a navigation event and so should not be invoked by the course itself—only the run-time environment (typically LMS) is supposed to control navigation. This is related to the SCORM philosophy of "reusable objects"—if an content object (SCO) contains a button that closes the window then it's making strong assumptions about where it will run (i.e. in a separate window rather than as part of a larger course) and hence is less reusable. So if one were to follow SCORM to the letter then the course should not have an Exit button at all.

In reality almost nobody does it that way—having an Exit button is a very common requirement.

EKP typically launches courses inside a frameset—frames are used for navigation, and a "hidden" frame is used for the SCORM API adapter. That's why window.close() won't work—it tries to close the frame rather than the top level window. If you use window.top.close() instead it should work in EKP. (Note: the name of the window object in JavaScript might be misleading, as it can refer to either a frame or a top-level window.) But there's no single method that's guaranteed to be 100% portable across LMSs, even if they are SCORM- and/or AICC-conformant.

Sunday, February 18, 2007

How do I enable Java tracing on a client machine?

When investigating issues related to SCORM courseware tracking, NetDimensions support staff might sometimes ask you to enable Java tracing on the client machine. Enabling Java tracing causes information about API calls made by the course to be written to a trace file on the client. The steps below describe how to enable Java logging when using Sun Microsystems' Java Runtime Environment (RTE).

  1. Open the Java Control Panel. (On Windows, this can be done by going to Start > Control Panel, and double-clicking the Java icon.)
  2. In the Java Control Panel window, click on the Advanced tab.
  3. On the Advanced tab, expand the Debugging item by clicking on the plus sign icon.
  4. Ensure the checkbox labeled Enable tracing is checked.
  5. Click OK.

By default, the trace file is written to the <user>\Sun\Java\Deployment\log directory on Windows. Sun Microsystems' web site has more information on Java tracing and logging.

Note that the information written to the log file is generally the same as is available in the Java console. However, unlike the console, the information in the log file is still available after a browser restart or browser crash.

How do I enable HACP tracing?

When investigating issues related to courseware tracking, NetDimensions support staff might sometimes ask you to enable HACP tracing. Enabling HACP tracing causes detailed course tracking information to be written to the server log file. (HACP is the HTTP AICC CMI Protocol, which is what most AICC-conformant courses use to communicate with EKP.)

  • To enable HACP tracing temporarily (until next system restart), go to Manage > System Administration Manager > System Support Functions > Debug/Tracing Options. Ensure ON is selected in the drop-down list labeled HACP Tracing, then click Save.
  • To enable HACP tracing permanently, ensure the value of the system.aicctrace property is set to true in the ekp.properties configuration file (which is located in the WEB-INF/conf/ directory). That is, the ekp.properties file should contain the line below.
    system.aicctrace=true
    This change to the ekp.properties file will take effect the next time EKP is reloaded.

It will often be desirable to make both of the changes described above.

Tuesday, February 13, 2007

What is PENS, and when should I use it?

Starting from version 4.5, EKP supports Package Exchange Notification Services (PENS). PENS enables one-click publishing of courses from a PENS-conformant authoring tool or LCMS to EKP. Note that PENS is not a format for learning content like SCORM or AICC CMI001. That is, by itself it does not define any formats or protocols for course catalog metadata, course structure, course/LMS communication, or sequencing. PENS simply defines a way for a publishing tool to notify a delivery system (LMS) that new content is available for collection. The relevant content is still transferred using an establish format such as SCORM or AICC packages (most commonly the former).

So PENS is not an alternative to, say, SCORM content packages. Rather, it simply eliminates the step of manually exporting a content package from the publishing system and then importing it into EKP. Note that if your workflow requires you to make use of the packages (e.g. you need to manually modify the packages, or wish to archive them outside of EKP) then it's probably not appropriate to use PENS.

How can I use PENS to enable one-click publishing from an authoring tool or LCMS to EKP?

Starting from version 4.5, EKP supports the Package Exchange Notification Services (PENS). PENS enables one-click publishing of courses from a PENS-conformant authoring tool or LCMS to EKP.

To configure the authoring tool or LCMS to publish courses to EKP using PENS, you will need three pieces of information: a URL, a user name, and a password.

The URL is simply the base URL for the site, followed by pens. A typical URL is shown below; if you have changed the default protocol or path for your site, you'll need to modify this URL as appropriate.

http://ekp.example.com/ekp/pens

(N.B. If you encounter problems, check that you can access the PENS URL directly in a browser. You should get a response similar to the one below. If you see a 404 Not Found message or similar, there might be a configuration problem with your web server; see I get a 404 Not Found page when accessing EKP's PENS URL, what should I do? for an explanation of how to resolve it.)

error=0
error-text=collect command received and understood
version=1.0.0
pens-data=

The user name and password should correspond to an EKP user in a role that allows them to import courses.

Thursday, February 8, 2007

What are learning program sessions for?

A learning program is a co-ordinated sequence of modules designed to meet a particular learning objective or objectives. Programs can be "blended" in that they can combine both synchronous and asynchronous modules, and both online and offline modules.

Typically, you would create multiple sessions for a particular program if you have essentially the same sequence of modules taking place at different times, or in different geographical locations. For example, you might have a Spring 2007 session and a Fall 2007 session for a particular program. Usually an individual learner would be enrolled in at most one session of a particular program.

Note that this applies mainly to programs that include at least one instructor-led module. There's typically no reason to have more than one session for a program that contains only "asynchronous" online modules.

If you need to have multiple sequences of modules with different learning objectives, it's generally more appropriate to create multiple programs, rather than having multiple sessions of a single program.

Tuesday, February 6, 2007

Can I create a custom Table of Contents for a multi-SCO SCORM course?

A SCORM-conformant course contains one or more Sharable Content Objects (SCOs). A SCO is defined as the smallest unit of content that can be independently tracked by a SCORM-conformant run-time environment (i.e. an LMS). Although it's quite common for courses to be built using only a single SCO, this post concerns courses that are built using more than one SCO.

Where a course contains multiple SCOs, it needs to be set up in EKP in such a way that EKP is aware of the individual SCOs. Normally this happens automatically if the course is imported from a SCORM content package, as the imsmanifest.xml file in the package tells EKP what it needs to know about the individual SCOs. (If necessary, the same thing can also be accomplished manually using the Courseware Manager, by creating a separate lesson for each SCO and setting the Run-Time Environment for each lesson to "JavaScript API".) When the course is set up in this way, EKP provides navigation controls that learners can use to navigate between the SCOs. (If the course is built using only one SCO, these navigation controls are redundant and do not appear.) In this way, EKP can keep track of which SCO the learner is currently attempting, and can ensure that any progress information communicated by a SCO is associated with the appropriate SCO in EKP's records. EKP can also "roll-up" progress information from each lesson to provide overall progress information for the course.

However, this only works if EKP's own navigation controls are used to launch the SCOs; it won't work if you attempt to create a custom Table of Contents page and link to the individual SCOs from there. This is because EKP is unable to keep track of which SCO the learner is currently attempting—and, in fact, EKP is unaware that the course contains multiple SCOs. Any progress information communicated by an individual SCO will therefore be interpreted as course-level progress information; so, for example, when an individual SCO reports that it is completed this will be interpreted as completion of the course as a whole.

The solution is to avoid using a custom Tables of Contents for multi-SCO courses. Instead, import the course using the original content package, and ensure that the learner navigates between the SCOs using the navigation controls provided by EKP. (On the Navigation Setup page in the Catalog Editor, you can configure for each individual multi-SCO course whether EKP displays the top navigation frame only, the left navigation frame only, or both frames. You can also customize the look-and-feel of EKP's navigation controls by creating a courseware template and uploading it under Manage > Courseware Manager > Courseware Template Editor.)

Monday, February 5, 2007

I get a 404 Not Found page when accessing EKP's PENS URL, what should I do?

Starting from version 4.5, EKP supports the Package Exchange Notification Services (PENS). The URL used for notifications is typically /ekp/pens.

If you see a 404 Not Found error when attempting to access this URL, it's likely that your web server (e.g. Apache HTTPD) is not configured to forward requests for this URL to your application server (e.g. Apache Tomcat).

If your web server is Apache, you can fix this by editing the httpd.conf configuration file, which is in the conf/ directory under the Apache installation directory. If you open this file in a text editor, you will find a series of "directives" such as the following:

JkMount /ekp/tx/* ajp13
JkMount /ekp/servlet/* ajp13
JkMount /ekp/*.jsp ajp13
JkMount /ekp/servlet/ekp/* ajp13
JkMount /ekp/*.tx ajp13
JkMount /ekp/xml/* ajp13

(Note: in some installations, the above directives might be in a file named mod_jk.conf under the directory conf/jk/, instead of in httpd.conf itself.)

To enable PENS support, you should add one more directive as follows:

JkMount /ekp/pens ajp13

You'll need to restart Apache for that change to take effect. Note also that if the prefix for your site is something other than /ekp, you'll need to modify the directive above as appropriate.

Thursday, February 1, 2007

How do I find out what build of EKP I'm running?

When you report a bug, it's really important that you let us know the exact build of EKP you're running. This isn't just the major version number (like EKP 4.6), but includes four numbers separated by dots, for example 4.6.0.78. With this information, along with relevant messages from the log file, we'll be able to investigate your problem much more quickly.

To find out what build you're using, go to Manage > System Administration Manager > System Statistics > System Activity Statistics. On the System Activity Statistics page, look for the value labeled EKP Version in the System Environment section. The value will be something like Release 4.6.0.78 STANDARD. The four numbers in the middle (e.g. 4.6.0.78 in this example) are what we need.